Internet connection problems with eircom efibre fixed
Eircom’s eFibre product is their fastest home broadband offering, promising speeds of up to 100mb. The connection speeds are generally quite good, being capable of handling TV, Netflix and a handful of other connected devices all at once without any real issue on the speed. However the one black mark against the service would be the intermittent issues with the eircom DNS servers. This can often cause internet connection problems, where the net connection shows as active but nothing loads. Frustrating!
What's causing the internet connection problems?
Internet connection problems have a wide variety of possible causes (bad line, network down, device problems etc), but I’ve found the most common by a long shot to be a problem with the eircom DNS servers. DNS servers are the machines that translates a request for a human-readable domain like www.google.com in to the IP address 74.125.24.103 so that your machine knows how to connect to the right server. When these servers aren’t working correctly, it means that this translation never happens, so the computers on your network don’t know where to go. The connection is technically active, and some apps like Skype may still work, but anything relying on this DNS server will likely time out and fail.
Fortunately it’s relatively simple to fix, without much technical know-how required. Google provide DNS servers that have a much lower rate of failure than eircom’s own ones. Changing the eFibre router to use the Google DNS servers means that the failing eircom ones are taken out of the loop, and the internet is accessible once more.
Updating the eFibre router to use Google DNS
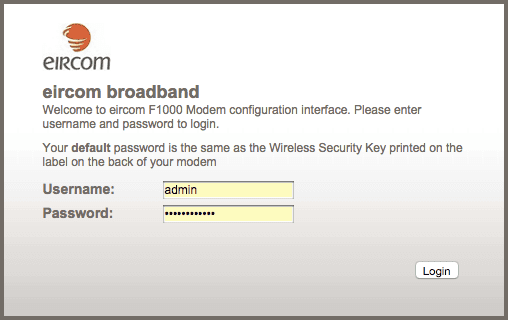
Eircom use the Zyxel F1000 router for their eFibre offering. It has a web-accessible control panel through which the DNS can be updated. So, from a device on your network, type http://192.168.1.254 in to your web browser’s address bar. You should then see a page like the below. If you get a ‘page not found’ error, try http://192.168.1.1 instead.

To log in to this admin panel, you’ll need the security key from your router. This is the code printed on the back, unless you’ve changed it at some point. If the code hasn’t been changed, the next two screens will prompt you to update it to a new code. It’s advisable to change from the default code, but if you don’t want to do it at this point, you can keep hitting “Skip” until you get to the router dashboard.
Network settingsOnce the dashboard loads, there should be a series of icons at the bottom of the screen – “Connection Status”, “Network Settings”, “Security”, “System Monitor” and “Maintenance”. To get to the DNS settings, first click the “Network Settings” icon. This will open a menu above it – select “Home Networking” from this list.
On the next screen, scroll down until you see the “DNS Values” heading. Click the circle to the left of “Static”. In the first box, enter 8.8.8.8 and in the second, 8.8.4.4. These are the addresses of the Google DNS servers. Click the “Apply” button in the bottom right of the screen to finish the change.

Once this has been done the router should then be using Google’s DNS servers, and normal internet service should be resumed!
Update 30/11: As pointed out by highnellybike on twitter, the root of the connection issues may be more to do with the way the in-built DNS proxy on this modem works than with the DNS servers themselves. In which case the same instructions as above can be used in order to set a static dDNSns server, but instead of the Google DNS servers, the eircom ones of 159.134.0.1 and 159.134.0.2 may be used.
PHP UK Conference, London 2026
In February 2026, I'll be speaking at the PHP UK Conference in London. I'll be telling the story behind EverythingIsShowbiz.com, a site that went from a vibe-coded side project, to a useful experiment in integration of AI into PHP workflows.
Get your ticket now and I'll see you there!
