Using Google Sheets as a RESTful JSON API
In this article, we'll cover how to create a simple and free RESTful JSON API, using Google Sheets as a data source. This can be a very effective pattern for simple CRUD applications - anywhere the data is managed by non-technical users, with an app which is a simple consumer of that data.
For our example, we'll work with election results, showing the seats won by each party. The data can be updated in a google sheet by an editorial team, and will be converted into an API endpoint for a frontend chart or table to feed from. This type of niche and specific data can be a pain to shoehorn into existing systems, so is a perfect candidate for our lightweight approach here!
Advantages of using Google Sheets as an API
Google Sheets is a powerful tool for managing data, and is widely used by non-technical users. It provides a familiar interface for managing data, and can be easily shared and collaborated on. Things like user authentication are already built into Google Sheets, and it can be accessed from anywhere with an internet connection. This makes it a great choice for managing data for simple CRUD applications.
Setting up the Google Sheet
The first step is to create a new Google Sheet, and add some data to it. For our election example, we'll create a simple sheet with a list of political parties, and the seats they have won so far.
| Party | Seats |
|---|---|
| Conservative Progressives | 24 |
| Democratic Socialist Coalition | 18 |
| Independents | 10 |
| Judean People's Front | 16 |
| People's Front of Judea | 17 |
| Progressive Conservative Party | 25 |
| Social Democratic Alliance | 19 |
Next we need to write the script which will convert this data into a JSON endpoint. In Google Sheets, go to "Extensions" then "Apps Script".

We'll name the project "Election Tracker", then clear the code stub from the code window.
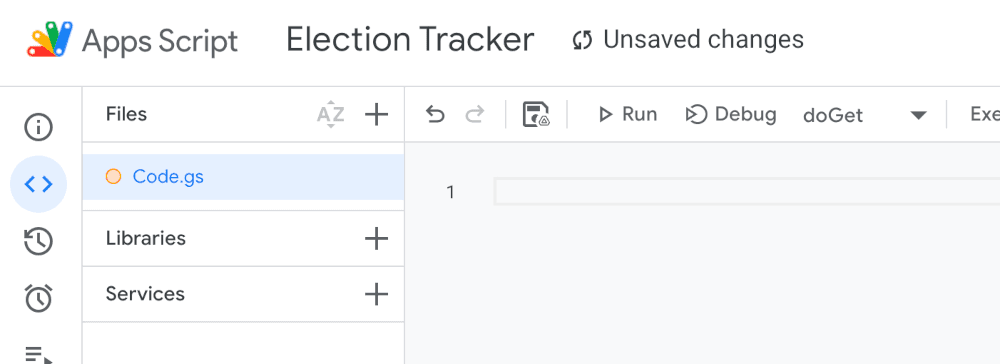
Google Apps Script reserves the doGet and doPost function names to handle GET and POST requests. We're creating a simple GET endpoint, and aren't implementing any kind of auth on it - it's a public endpoint. However, Google's account access and auth can be a bit fiddly, so we'll start with a simple API response and focus on getting the auth out of the way first. Let's start by putting this placeholder code into the Apps Script window:
function doGet() {
  let result = {"message":"hello"};
  return ContentService.createTextOutput(JSON.stringify(result))
    .setMimeType(ContentService.MimeType.JSON);
}
Publishing the Google Sheet
Next, we need to publish the Google Sheet to the web. This makes the data accessible via a URL, which we can use to access the data via the API. Click the blue "Deploy" button in the top right of the screen, then on the dropdown "New deployment". From the window which appears, click the cog beside "Select Type" and select "Web app".
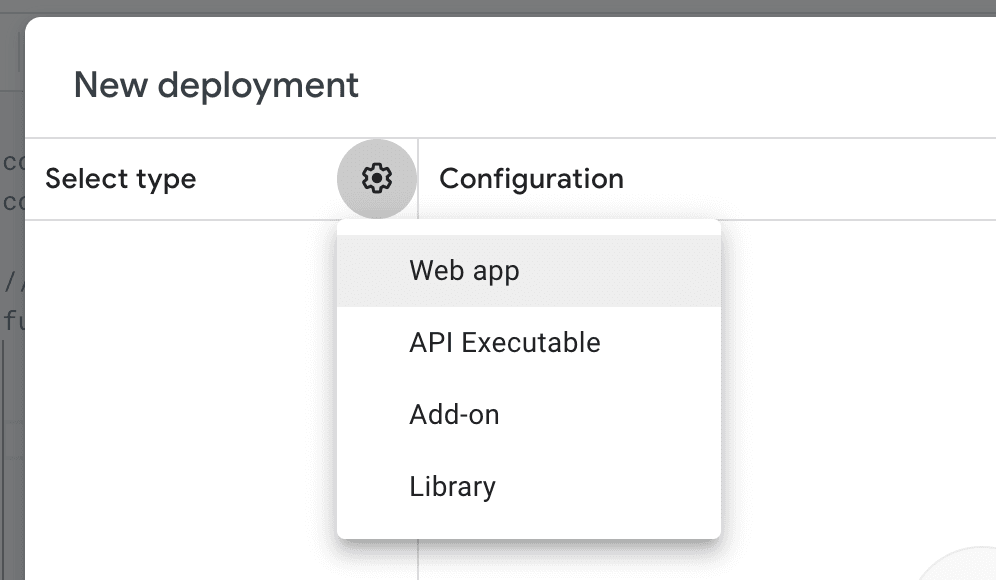
Give our deployment a description. Every time we do a new deployment, we'll be asked to enter a new description, so think of this like a commit log. "Initial Test", "Seat Count" or the like is fine for the first pass here. Now we set up access permissions. If we want to allow general public access to the API, the "Execute as" setting should be your google account, and in "Who has access", set it to "Anyone". Then click "Deploy".
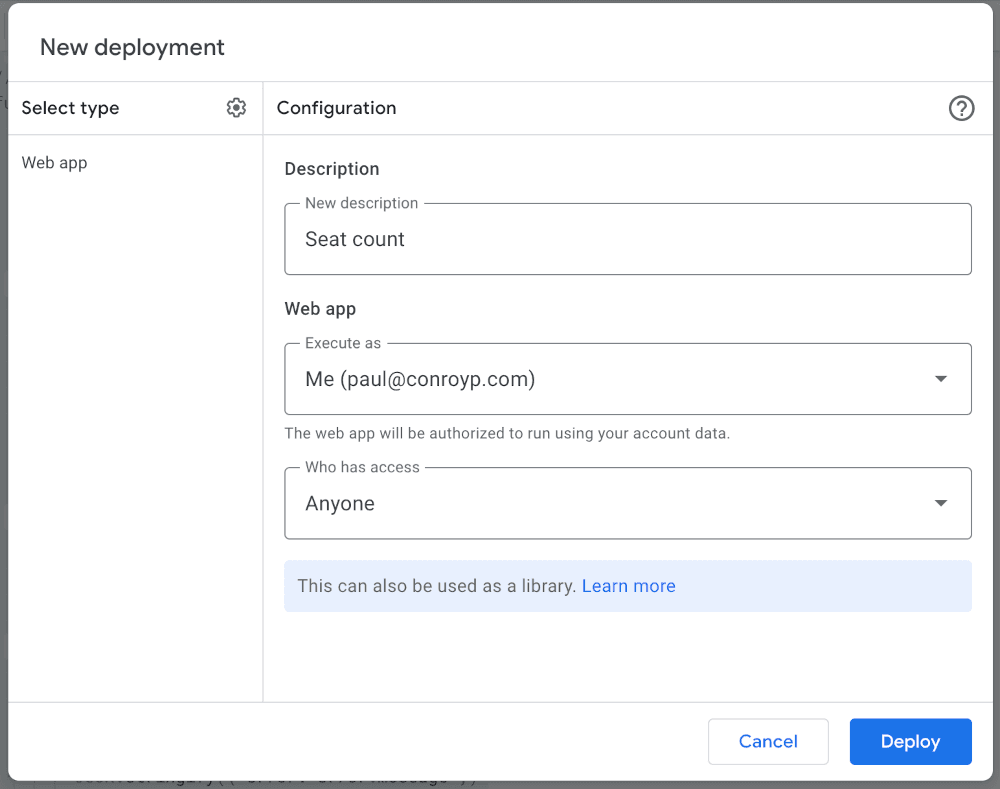
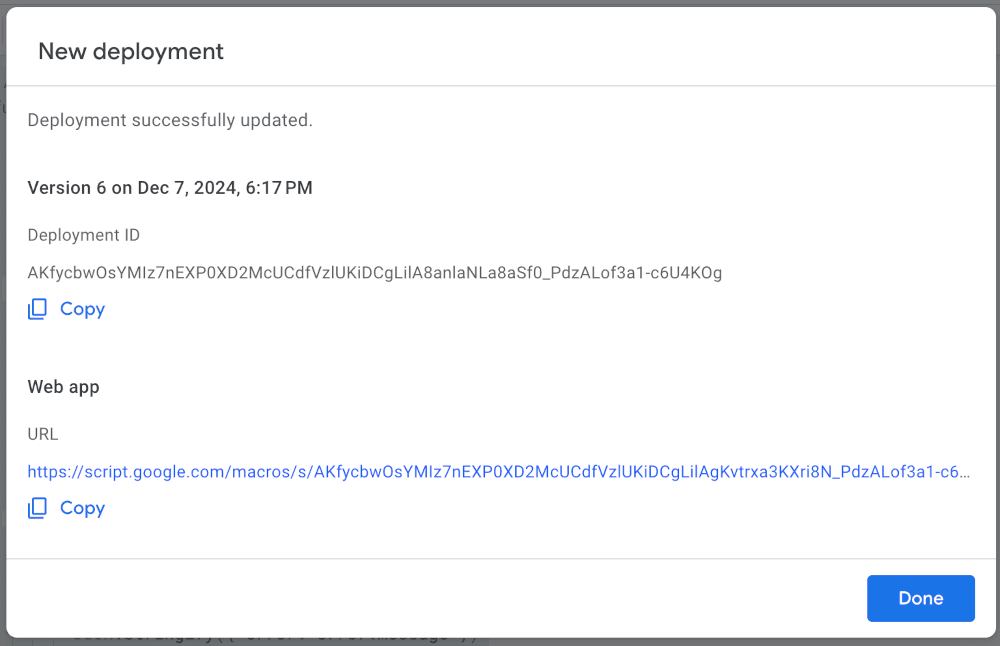
The deployment modal will give a deployment id, and a url. Checking this URL will redirect us to a specific deployment URL, and take a few seconds to load, but it should ultimately show the test payload we were expecting.
{
  "message": "hello"
}
Calling this URL via curl or in an incognito window confirms that it's working ok for public access, i.e. we're not sneaking through thanks to our logged-in google account. Now that we've got the flow working, it's time to implement the full script!
Implementing the API
What we want to do is:
- Load the main data sheet from the script.
- Read in all party + seat data.
- Sort descending.
- Output as json.
Firstly, ensure that the sheet has been named "Seats". Then update the code in the Apps Script to:
// This name must match our sheet name
const SHEET_NAME = "Seats";

// GET Function: Retrieve seat counts
function doGet() {
  try {
    const sheet = SpreadsheetApp.getActiveSpreadsheet().getSheetByName(SHEET_NAME);
    if (!sheet) {
        throw new Error("Sheet not found");
    }
    const data = sheet.getDataRange().getValues();

    const seatCounts = {};
    // Start from 1 to skip the header row
    for (let i = 1; i < data.length; i++) {
        // Assuming data is in PARTY,COUNT format
        // @TODO: Toy example here, but error checking would
        // be required in a more serious implementation
        seatCounts[data[i][0]] = data[i][1];
    }

    // Convert to ordered array
    const result = Object.entries(seatCounts)
        .map(([party, total]) => ({ party, total }))
        .sort((a, b) => b.total - a.total);

    return ContentService.createTextOutput(JSON.stringify(result))
        .setMimeType(ContentService.MimeType.JSON);

  } catch (error) {

    return ContentService.createTextOutput(
        JSON.stringify({ error: error.message })
    ).setMimeType(ContentService.MimeType.JSON);

  }
}
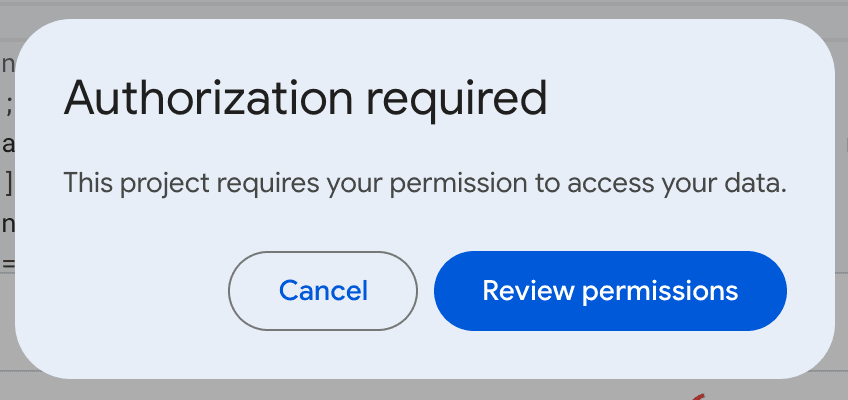
Click "Deploy -> New Deployment" and enter a new description. Now that we're linking our script to sheet data, we're asked for additional permissions on our google account. Grant these via the oauth window which pops up, and we get another deployment url. Notice that this one is different to the one we got earlier - each deployment gets its own unique URL.
Accessing this URL again loads our sorted json:
[
  {
    "party": "Progressive Conservative Party",
    "total": 25
  },
  {
    "party": "Conservative Progressives",
    "total": 24
  },
  {
    "party": "Social Democratic Alliance",
    "total": 19
  },
  {
    "party": "Democratic Socialist Coalition",
    "total": 18
  },
  {
    "party": "People's Front of Judea",
    "total": 17
  },
  {
    "party": "Judean People's Front",
    "total": 16
  },
  {
    "party": "Independents",
    "total": 10
  }
]
Accessing the Google Sheets API
As noted above, the URL Google Sheets gives us will 302 to another, longer URL. When we're working with the URL from a frontend, make sure to use a library which will follow 302s. Alternatively you could click the URL, see where it's 302d to, and use that URL in your application, but it's likely safer to go with the URL Google give, as it's no guarantee the 302 won't change to point at a different URL at some point.
For example, javascript's fetch will automatically handle a 302 fine:
const url = 'https://script.google.com/macros/s/SCRIPT_URL_HERE/exec';
fetch(url)
  .then(response => response.json())
  .then(data => console.log(data));
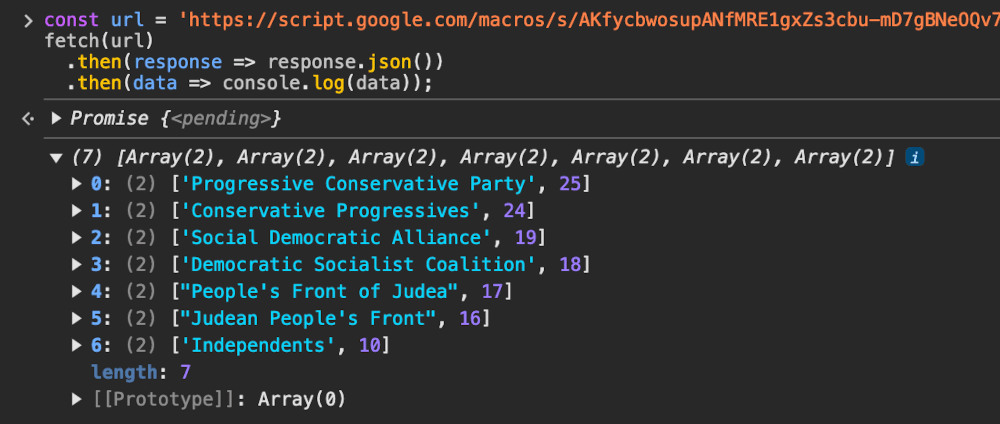
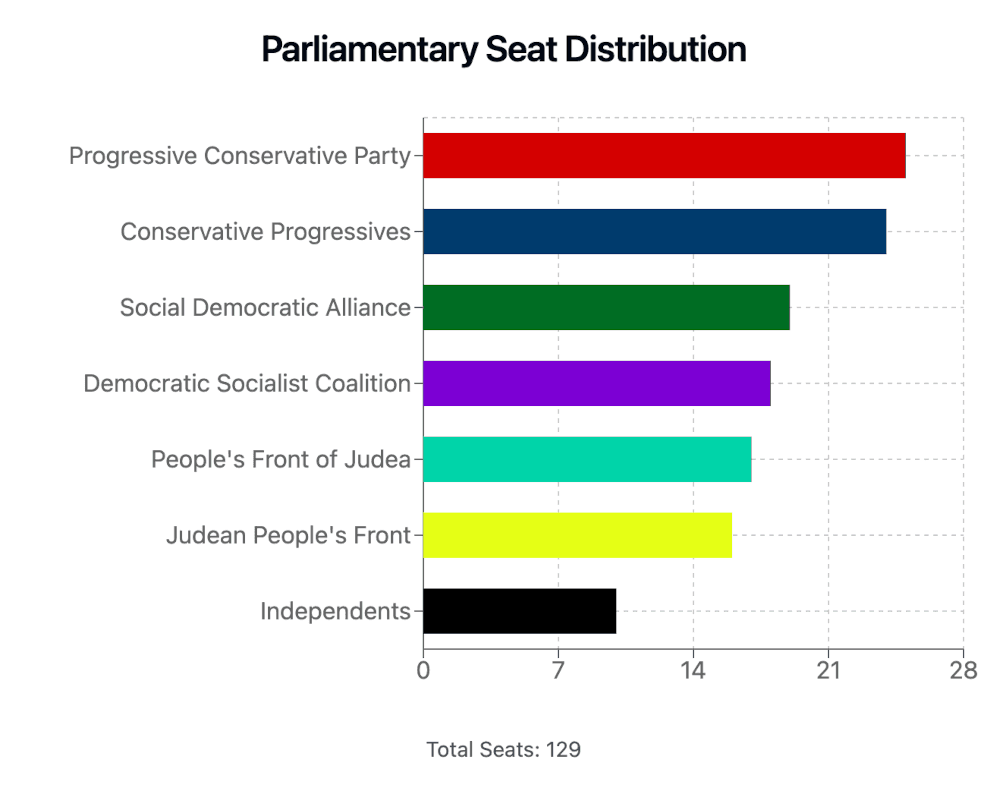
Once this info is accessible, it can be used to build whatever type of visualisation is required at app level:
Updating the Google Sheet
One of the great things about this setup is that non-technical users can easily update the data in the Google Sheet, and the changes will be reflected in the API response within a matter of seconds. This makes it easy to manage data for simple CRUD applications without needing to build a dedicated backend.
Rate limits
One thing to keep in mind when using the Sheets API is that Google does apply rate limits:
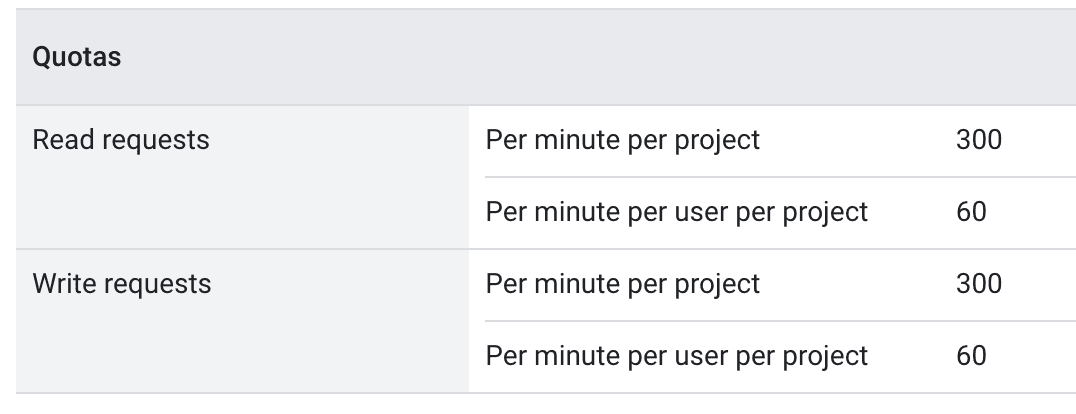
If the app is going to be in heavy usage, it may be worth exploring caching of the response to avoid rate limits. I've written in a bit more detail about a nice serverless approach to managing this cache using Cloudlare workers.
Conclusion
Using Google Sheets as a data source for a simple RESTful JSON API can be a great way to quickly build simple CRUD applications. It allows non-technical users to manage the data directly, and provides a familiar interface for doing so. This can be a very effective pattern for simple applications or prototypes, where the data is the primary focus, and the app is a simple consumer of that data. The API itself can be a little slow to load (2-3 seconds load time isn't unusual), but as a way to stand up a quick backend, it's definitely an option worth exploring. And when coupled with serverless API caching via Cloudflare Workers, we can quickly get the guts of a powerful and reliable backend API in place!
PHP UK Conference, London 2026
In February 2026, I'll be speaking at the PHP UK Conference in London. I'll be telling the story behind EverythingIsShowbiz.com, a site that went from a vibe-coded side project, to a useful experiment in integration of AI into PHP workflows.
Get your ticket now and I'll see you there!
